[toc]
Ajax技术
https://www.bilibili.com/video/BV1xK411U7hR
一. 初识前后端交互
传统网站的问题:
- 为了获取数据,需要重新加载,浪费资源,增加等待时间,性能不好
- 验证表单过程中,一项内容不合格,页面需要重新加载,体验不好
<!DOCTYPE html>
<html lang="en">
  <head>
    <meta charset="UTF-8" />
    <meta
      name="viewport"
      content="width=device-width, user-scalable=no, initial-scale=1.0"
    />
    <title>01_ajax之前的前后端交互</title>
  </head>
  <body>
    <!-- 表单提交后跳到http://www.baidu.com?username=xxx&password=xxx -->
    <form action="http://www.baidu.com">
      <p>用户名<input type="text" name="username" /></p>
      <p>密码 <input type="password" name="password" /></p>
      <button type="submit">登录</button>
    </form>
  </body>
</html>
**解决方案:**
ajax全名async javascript and XML- 是前后台交互的能力
- 也就是我们客户端给服务端发送消息的工具,以及接受响应的工具
- 是一个 默认异步 执行机制的功能(异步,就是不阻塞,不一定要等到请求返回响应,而是继续执行,等js空闲的时候,再执行回调函数)
AJAX 的优势
- 不需要插件的支持,
原生JavaScript就可以使用(ajax是一种异步前后端技术的概念, 而XMLHttpRequest才是javascript里的内容) - 用户体验好(不需要刷新页面就可以更新数据)
- 减轻服务端和带宽的负担
缺点:搜索引擎的支持度不够,因为数据都不在页面上,搜索引擎搜索不到
二. 原生Ajax
1. AJAX 基础
- 在 js 中有内置的构造函数来创建
ajax 对象 - 创建 ajax 对象以后,我们就使用 ajax 对象的方法去发送请求和接受响应
创建一个 ajax 对象
// IE9及以上
const xhr = new XMLHttpRequest()

// IE9以下
const xhr = new ActiveXObject('Mricosoft.XMLHTTP')- 上面就是有了一个 ajax 对象
- 我们就可以使用这个
xhr对象来发送 ajax 请求了
配置链接信息
const xhr = new XMLHttpRequest()

// xhr 对象中的 open 方法是来配置请求信息的
// 第一个参数是本次请求的请求方式 get / post / put / ...
// 第二个参数是本次请求的 url
// 第三个参数是本次请求是否异步,默认 true 表示异步,false 表示同步
// xhr.open('请求方式', '请求地址', 是否异步)
xhr.open('get', './data.php')- 上面的代码执行完毕以后,本次请求的基本配置信息就写完了
发送请求
const xhr = new XMLHttpRequest()
xhr.open('get', './data.php')

// 使用 xhr 对象中的 send 方法来发送请求
xhr.send()- 上面代码是把配置好信息的 ajax 对象发送到服务端
一个基本的 ajax 请求
- 一个最基本的 ajax 请求就是上面三步
- 但是光有上面的三个步骤,我们确实能把请求发送的到服务端
- 如果服务端正常的话,响应也能回到客户端
- 但是我们拿不到响应
- 如果想拿到响应,我们有两个前提条件
- 本次 HTTP 请求是成功的,也就是我们之前说的==http 状态码为 200 ~ 299==
- ajax 对象也有自己的状态码,用来表示本次 ajax 请求中各个阶段
ajax 状态码
- ajax 状态码 -
xhr.readyState - 是用来表示一个 ajax 请求的全部过程中的某一个状态
readyState === 0: 表示未初始化完成,也就是open方法还没有执行readyState === 1: 表示配置信息已经完成,也就是执行完open之后readyState === 2: 表示send方法已经执行完成readyState === 3: 表示正在解析响应内容readyState === 4: 表示响应内容已经解析完毕,可以在客户端使用了
- 这个时候我们就会发现,当一个 ajax 请求的全部过程中,只有当
readyState === 4的时候,我们才可以正常使用服务端给我们的数据 - 所以,配合 http 状态码为 200 ~ 299
- 一个 ajax 对象中有一个成员叫做
xhr.status - 这个成员就是记录本次请求的 http 状态码的
- 一个 ajax 对象中有一个成员叫做
- 两个条件都满足的时候,才是本次请求正常完成
<!DOCTYPE html>
<html lang="en">
  <head>
    <meta charset="UTF-8" />
    <meta name="viewport" content="width=device-width, initial-scale=1.0" />
    <title>Ajax基础</title>
  </head>
  <body>
    <button>你好</button>
    <script>
      let xhr = new XMLHttpRequest();

      // 参数1: 请求方式, 参数2: 请求地址(可以相对或者绝对路径), 参数3: 是否异步
      xhr.open("GET", "1.txt", true); // get请求,参数放在url中
      let button = document.querySelector("button");
      button.addEventListener("click", function () {
        xhr.send(); // 发送请求
      });

      // 监听状态改变
      xhr.onreadystatechange = function () {
        // 发送请求之后, 状态改变经过多次改变
        // 状态码为4, 说明请求成功
        if (xhr.readyState === 4) {
          //if (xhr.status === 200) { // 状态码200 ~ 299 为正常
          if (/^2\d{2}$/.test(xhr.status)) {
            // 使用正则表达式判断
            console.log(JSON.parse(xhr.responseText));
          } else {
            console.log("请求失败", xhr.responseText);
          }
        }
      };

      // 直接使用xhr.onload
      xhr.onload = function () {
        if (/^2\d{2}$/.test(xhr.status)) {
          console.log(xhr.response);
        } else {
          console.log("请求失败", xhr.response);
        }
      };
    </script>
  </body>
</html>
readyStateChange
在 ajax 对象中有一个事件,叫做
readyStateChange事件这个事件是专门用来监听 ajax 对象的
readyState值改变的的行为也就是说只要
readyState的值发生变化了,那么就会触发该事件所以我们就在这个事件中来监听 ajax 的
readyState是不是到 4 了const xhr = new XMLHttpRequest() xhr.open('get', './data.php') xhr.send() xhr.onreadyStateChange = function () { // 每次 readyState 改变的时候都会触发该事件 // 我们就在这里判断 readyState 的值是不是到 4 // 并且 http 的状态码是不是 200 ~ 299 if (xhr.readyState === 4 && /^2\d{2}$/.test(xhr.status)) { // 这里表示验证通过 // 我们就可以获取服务端给我们响应的内容了 } }
responseText
ajax 对象中的
responseText成员就是用来记录服务端给我们的响应体内容的
所以我们就用这个成员来获取响应体内容就可以
const xhr = new XMLHttpRequest()
xhr.open('get', './data.php')

xhr.send()

xhr.onreadyStateChange = function () {
  if (xhr.readyState === 4 && /^2\d{2}$/.test(xhr.status)) {
    // 我们在这里直接打印 xhr.responseText 来查看服务端给我们返回的内容
    console.log(xhr.responseText)
  }
}
2. Ajax案例
!DOCTYPE html>
<html lang="en">
  <head>
    <meta charset="UTF-8" />
    <meta name="viewport" content="width=device-width, initial-scale=1.0" />
    <title>Ajax案例1</title>
  </head>
  <body>
    <button id="btn">click</button>
    <ul></ul>
    <script>
      var btn = document.getElementById("btn");
      btn.addEventListener("click", function () {
        var xhr = new XMLHttpRequest();
        xhr.open("GET", "data.json", true);
        xhr.send();
        xhr.onload = function () {
          if (/^2\d{2}$/.test(xhr.status)) {
            var res = JSON.parse(xhr.responseText);
            render(res);
          } else {
            console.log("error");
          }
        };
      });

      function render(res) {
        console.log(res.projects); //"projects": [{},{}]
        var newlist = res.projects.map(function (item) {
          // map()方法返回一个新数组,其中的元素是对原数组每个元素调用函数处理后返回的结果。
          return `<li>
            <img src="${item.imgurl}" alt="${item.name}"/>
            <div>${item.name}</div>
            </li>`; // 返回一个li标签的html字符串
        });
        // console.log(newlist);
        var ul = document.querySelector("ul");
        ul.innerHTML = newlist.join(""); // join()方法用于将数组中的所有元素连接成一个字符串。
      }
    </script>
  </body>
</html>
map方法
map 方法是 JavaScript 中数组的一个内置函数,它用于对数组中的每个元素执行一个指定的函数,并返回一个新数组,该新数组包含了结果。
使用方法
map 方法的基本语法如下:
let newArray = array.map(function(element, index, array) {
    // 返回处理后的元素
});element:当前正在处理的数组元素。index:当前元素的索引(可选)。array:调用map方法的原数组(可选)。
示例
下面是一个简单的示例,演示如何使用 map 方法:
let numbers = [1, 2, 3, 4, 5];
let doubled = numbers.map(function(number) {
    return number * 2;
});

console.log(doubled); // 输出: [2, 4, 6, 8, 10]
在这个例子中,我们使用 map 方法将 numbers 数组中的每个元素都乘以 2,并返回一个新数组 doubled,其中包含处理后的结果。
使用箭头函数
你也可以使用箭头函数来简化 map 的写法:
let numbers = [1, 2, 3, 4, 5];
let doubled = numbers.map(number => number * 2);

console.log(doubled); // 输出: [2, 4, 6, 8, 10]
es6之字符串模板
ES6(ECMAScript 2015)引入了模板字符串(Template Literals),这是一个非常方便的字符串处理方式。模板字符串不仅可以包含普通字符串,还可以嵌入表达式,并支持多行字符串。
语法
模板字符串使用反引号``` ``括起来,而不是单引号或双引号。
特性
多行字符串: 模板字符串可以包含换行符,便于书写多行文本。
const message = `你好, 欢迎使用ES6的字符串模板。`; console.log(message);嵌入表达式: 可以使用
${}语法在字符串中嵌入表达式。const name = '张三'; const age = 25; const greeting = `我叫 ${name},今年 ${age} 岁。`; console.log(greeting); // 输出: 我叫 张三,今年 25 岁。多种表达式支持: 支持任何有效的JavaScript表达式,包括函数调用和运算。
const a = 5;
const b = 10;
const sum = `5 + 10 = ${a + b}`;
console.log(sum); // 输出: 5 + 10 = 15
嵌套模板字符串
可以通过反引号直接在模板字符串中嵌套其他模板字符串:
const name = '李四';
const info = `姓名: ${name},职业: ${`软件工程师}`}`;
console.log(info); // 输出: 姓名: 李四,职业: 软件工程师
3. Ajax参数
使用Node第三方包模拟后端接口
- 安装node.js
- 安装
json-server包(注意要求的node.js版本)
npm install -g json-server- 使用
json-server
json-server ./db.json --watch此命令是将当前路径下的db.json文件的每一项变成一个路由接口,启动在 loaclhost:3000 下
json{
  "list": [],
  "users": [],
  "shopcar": [],
  "detail": {
    "name": "手机"
  }
}
http://localhost:3000/list
http://localhost:3000/users
http://localhost:3000/shopcar
http://localhost:3000/detail
使用 ajax 发送请求时携带参数
- 我们使用 ajax 发送请求也是可以携带参数的
- 参数就是和后台交互的时候给他的一些信息
- 但是携带参数 get 和 post 两个方式还是有区别的
发送一个带有参数的 get 请求
get 请求的参数就直接在 url 后面进行拼接就可以
(参数直接暴露)const xhr = new XMLHttpRequest() // 直接在地址后面加一个 ?,然后以 key=value 的形式传递 // 两个数据之间以 & 分割 xhr.open('get', './data.php?a=100&b=200') xhr.send()- 这样服务端就能接受到两个参数
- 一个是 a,值是 100
- 一个是 b,值是 200
发送一个带有参数的 post 请求
post 请求的参数是携带在请求体中的,所以不需要再 url 后面拼接
const xhr = new XMLHttpRequest() xhr.open('get', './data.php') // 如果是用 ajax 对象发送 post 请求,必须要先设置一下请求头中的 content-type // 告诉一下服务端我给你的是一个什么样子的数据格式 xhr.setRequestHeader('content-type', 'application/x-www-form-urlencoded') // 请求体直接再 send 的时候写在 () 里面就行 // 不需要问号,直接就是 'key=value&key=value' 的形式 xhr.send('a=100&b=200')application/x-www-form-urlencoded表示的数据格式就是key=value&key=value
不同的请求方式
get 偏向获取
post 偏向提交
put 偏向更新(覆盖式的更新)
patch 偏向修改部分(补丁式的更新)
delete 偏向删除信息
head 偏向获取服务器头的信息
option 偏向获取服务器设备信息
connnect 保留请求方式
<!DOCTYPE html>
<html lang="en">
  <head>
    <meta charset="UTF-8" />
    <meta name="viewport" content="width=device-width, initial-scale=1.0" />
    <title>Document</title>
  </head>
  <body>
    <button id="get">get</button>
    <button id="post">post</button>
    <button id="put">put</button>
    <button id="patch">patch</button>
    <button id="delete">delete</button>
    <script>
      var getBtn = document.getElementById("get");
      var postBtn = document.getElementById("post");
      var putBtn = document.getElementById("put");
      var patchBtn = document.getElementById("patch");
      var deleteBtn = document.getElementById("delete");

      getBtn.onclick = function () {
        var xhr = new XMLHttpRequest();
        // xhr.open("GET", "http://localhost:3000/list", true);
        xhr.open("GET", "http://localhost:3000/users?id=3a8b", true);
        xhr.send();
        xhr.onload = function () {
          if (/^2\d{2}$/.test(xhr.status)) {
            var res = JSON.parse(xhr.responseText);
            console.log(res);
          } else {
            console.log("error");
          }
        };
      };
      postBtn.onclick = function () {
        var xhr = new XMLHttpRequest();
        xhr.open("POST", "http://localhost:3000/users", true);
        // form编码 name=value&name=value
        // json {"name": "value", "name": "value"}
        // xhr.setRequestHeader(
        //   "content-type",
        //   "application/x-www-form-urlencoded"
        // );
        // xhr.send(`name=wangwu&age=40`); // 参数放在send方法中

        xhr.setRequestHeader("Content-Type", "application/json");
        xhr.send(JSON.stringify({ name: "wangwu", age: 40 })); // 参数放在send方法中

        xhr.onload = function () {
          if (/^2\d{2}$/.test(xhr.status)) {
            var res = JSON.parse(xhr.responseText);
            console.log(res);
          } else {
            console.log("error", xhr.responseText);
          }
        };
      };
      putBtn.onclick = function () {
        var xhr = new XMLHttpRequest();
        xhr.open("PUT", "http://localhost:3000/users/3a8b", true); // 注意要更新数据的id放在url中
        xhr.setRequestHeader("Content-Type", "application/json");
        // xhr.send(JSON.stringify({ age: 40 })); // 覆盖式更新,不写其他字段将会删除原有数据
        xhr.send(JSON.stringify({ name: "张三", age: 40 }));

        xhr.onload = function () {
          if (/^2\d{2}$/.test(xhr.status)) {
            var res = JSON.parse(xhr.responseText);
            console.log(res);
          } else {
            console.log("error", xhr.responseText);
          }
        };
      };
      patchBtn.onclick = function () {
        var xhr = new XMLHttpRequest();
        xhr.open("PATCH", "http://localhost:3000/users/3a8b", true); // 注意要更新数据的id放在url中
        xhr.setRequestHeader("Content-Type", "application/json");
        xhr.send(JSON.stringify({ age: 100 })); // 增量式更新,只更新指定的字段

        xhr.onload = function () {
          if (/^2\d{2}$/.test(xhr.status)) {
            var res = JSON.parse(xhr.responseText);
            console.log(res);
          } else {
            console.log("error", xhr.responseText);
          }
        };
      };
      deleteBtn.onclick = function () {
        var xhr = new XMLHttpRequest();
        xhr.open("DELETE", "http://localhost:3000/users/3a8b", true); // 注意要删除数据的id放在url中
        xhr.send();

        xhr.onload = function () {
          if (/^2\d{2}$/.test(xhr.status)) {
            var res = JSON.parse(xhr.responseText);
            console.log(res);
          } else {
            console.log("error", xhr.responseText);
          }
        };
      };
    </script>
  </body>
</html>
三. Fetch
XMLHttpRequest 是一个设计粗糙的 API,配置和调用方式非常混乱, 而且基于事件的异步模型写起来不友好。
**兼容性不好 **
对于ie8及以下的浏览器可以使用第三方 polyfill: https://github.com/camsong/fetch-ie8
1. 用法
fetch("http://localhost:3000/users")
            .then(res=>res.json())
            .then(res=>{
                console.log(res)
            })


fetch("http://localhost:3000/users",{
            method:"POST",
            headers:{
                "content-type":"application/json"
            },
            body:JSON.stringify({
                username:"kerwin",
                password:"123"
            })
        })
            .then(res=>res.json())
            .then(res=>{
                console.log(res)
            })

fetch("http://localhost:3000/users/5",{
            method:"PUT",
            headers:{
                "content-type":"application/json"
            },
            body:JSON.stringify({
                username:"kerwin",
                password:"456"
            })
        })
            .then(res=>res.json())
            .then(res=>{
                console.log(res)
            })

fetch("http://localhost:3000/users/5",{
            method:"DELETE"
        })
            .then(res=>res.json())
            .then(res=>{
                console.log(res)
            })
2. 错误处理
//
fetch("http://localhost:3000/users1")
            .then(res=>{
                if(res.ok){
                    return res.json()
                }else{
                    return Promise.reject({
                        status:res.status,
                        statusText:res.statusText
                    })
                }
            })
            .then(res=>{
                console.log(res)
            })
            .catch(err=>{
                console.log(err)
            })
3. 综合案例1
<!DOCTYPE html>
<html lang="en">
  <head>
    <meta charset="UTF-8" />
    <meta name="viewport" content="width=device-width, initial-scale=1.0" />
    <title>Document</title>
  </head>
  <body>
    <button id="get">get</button>
    <button id="post">post</button>
    <button id="put">put</button>
    <button id="patch">patch</button>
    <button id="delete">delete</button>
    <script>
      var getBtn = document.getElementById("get");
      var postBtn = document.getElementById("post");
      var putBtn = document.getElementById("put");
      var patchBtn = document.getElementById("patch");
      var deleteBtn = document.getElementById("delete");

      getBtn.onclick = function () {
        // fetch返回promise对象,可以用then方法处理数据,response是fetch返回的response对象
        // fetch("http://localhost:3000/users")
        //   .then((response) => {
        //     //   console.log(response.json());
        //     return response.json(); // 返回promise对象
        //   })
        //   .then((res) => {
        //     console.log(res);
        //   });
        fetch("http://localhost:3000/users?id=95aa")
          .then((res) => res.json())
          .then((res) => console.log(res))
          .catch((err) => console.log(err));
      };
      postBtn.onclick = function () {
        fetch("http://localhost:3000/users", {
          method: "POST",
          headers: {
            "Content-Type": "application/json",
          },
          body: JSON.stringify({ name: "李四", age: 30 }),
        })
          .then((res) => res.json())
          .then((res) => console.log(res));
      };
      putBtn.onclick = function () {
        fetch("http://localhost:3000/users/95aa", {
          method: "PUT",
          headers: {
            "Content-Type": "application/json",
          },
          body: JSON.stringify({ name: "李四", age: 55 }),
        })
          .then((res) => res.json())
          .then((res) => console.log(res));
      };
      patchBtn.onclick = function () {
        fetch("http://localhost:3000/users/95aa", {
          method: "PATCH",
          headers: {
            "Content-Type": "application/json",
          },
          body: JSON.stringify({
            age: 20,
          }),
        })
          .then((res) => res.json())
          .then((res) => console.log(res));
      };
      deleteBtn.onclick = function () {
        fetch("http://localhost:3000/users/95aa", {
          method: "DELETE",
        })
          .then((res) => res.json())
          .then((res) => console.log(res));
      };
    </script>
  </body>
</html>
4. 评论案例
json数据
{
  "news": [
    { "id": 1, "title": "男人看了震惊女人看了落泪", "author": "张三" },
    { "id": 2, "title": "震惊, 光天化日之下竟然", "author": "王五" },
    { "id": 3, "title": "速看! 超市大抢购", "author": "李四" }
  ],
  "comments": [
    { "id": 1, "content": "我是男人", "newsID": 1 },
    { "id": 2, "content": "我是女人", "newsID": 1 },
    { "id": 3, "content": "光天化日", "newsID": 2 },
    { "id": 4, "content": "这种事", "newsID": 2 },
    { "id": 5, "content": "我是评论", "newsID": 3 },
    { "id": 6, "content": "我也是评论", "newsID": 4 }
  ]
}
代码
<!DOCTYPE html>
<html lang="en">
  <head>
    <meta charset="UTF-8" />
    <meta name="viewport" content="width=device-width, initial-scale=1.0" />
    <title>Fetch使用案例</title>
  </head>
  <body>
    <input type="text" id="search" />
    <h2 id="title"></h2>
    <ul id="list"></ul>
    <script>
      var osearch = document.querySelector("#search");
      var otitle = document.querySelector("#title");
      var olist = document.querySelector("#list");
      var obtn = document.querySelector("button");
      /*   osearch.oninput = function () {
            var keyword = osearch.value;
            fetch(`http://localhost:3000/news?author=${keyword}`)
              .then((res) => res.json())
              .then((res) => console.log(res));
          }; */
      function throttle(fn, delay) {
        let lastTime = 0;
        return function (...args) {
          const now = Date.now();
          if (now - lastTime >= delay) {
            lastTime = now;
            return fn.apply(this, args);
          }
        };
      }

      //   osearch.oninput = throttle(function () {
      //     var keyword = osearch.value;
      //     fetch(`http://localhost:3000/news?author=${keyword}`)
      //       .then((res) => res.json()) // 获取新闻数据
      //       .then((res) => {
      //         if (res.length > 0) {
      //           otitle.innerHTML = res[0].title; // 显示新闻标题
      //           return fetch(
      //             `http://localhost:3000/comments?newsID=${res[0].id}`
      //           ).then((res) => res.json());
      //         } else {
      //           otitle.innerHTML = "没有找到相关新闻";
      //           // 空数组直接return
      //           return res;
      //         }
      //       })
      //       .then((res) => {
      //         console.log(res); // 打印评论数据
      //         olist.innerHTML = res
      //           .map((item) => `<li>${item.content}</li>`)
      //           .join(""); // 显示评论内容
      //       });
      //   }, 100); // 设置节流的时间间隔为100毫秒

      osearch.oninput = async function () {
        var keyword = osearch.value;
        var res = await fetch(
          `http://localhost:3000/news?author=${keyword}`
        ).then((res) => {
          console.log(res);

          return res.json();
        }); // 获取新闻数据
        var result;
        if (res.length > 0) {
          otitle.innerHTML = res[0].title; // 显示新闻标题
          result = await fetch(
            `http://localhost:3000/comments?newsID=${res[0].id}`
          ).then((res) => {
            // 此处的res是指fetch返回的promise对象
            return res.json();
          }); // 获取评论数据赋值给result
        } else {
          otitle.innerHTML = "没有找到相关新闻";
          result = res;
        }
        olist.innerHTML = result
          .map((item) => `<li>${item.content}</li>`)
          .join("");
        console.log(result);
      };
    </script>
  </body>
</html>
四. Axios
Axios是一个基于promise 的 HTTP 库,可以用在浏览器和 node.js中。
<script src="https://cdn.jsdelivr.net/npm/axios/dist/axios.min.js"></script>1. get请求
axios.get("http://localhost:3000/users",{
    params:{
        name:"kerwin"
    }
}).then(res=>{
    console.log(res.data)
})
2. post请求
axios.post("http://localhost:3000/users",{
    name:"kerwin",
    age:100
}).then(res=>{
	console.log(res.data)
})
3. put请求
axios.put("http://localhost:3000/users/12",{
    name:"kerwin111",
    age:200
}).then(res=>{
    console.log(res.data)
})
4. delete请求
axios.delete("http://localhost:3000/users/11").then(res=>{
    console.log(res.data)
})
5. axios(config)配置
axios({
    method: 'post',
    url: 'http://localhost:3000/users',
    data: {
        name: 'kerwin',
        age: 100
    }
})
    .then(res => {
    console.log(res.data)
}).catch(err=>{
    console.log(err)
})
6. axios拦截器
axios.interceptors.request.use(function (config) {
    // Do something before request is sent
    console.log("loading-开始")
    return config;
}, function (error) {
    // Do something with request error
    return Promise.reject(error);
});

// Add a response interceptor
axios.interceptors.response.use(function (response) {
    // Any status code that lie within the range of 2xx cause this function to trigger
    // Do something with response data

    console.log("loading---结束")
    return response;
}, function (error) {
    // Any status codes that falls outside the range of 2xx cause this function to trigger
    // Do something with response error
    console.log("loading---结束")
    return Promise.reject(error);
});- 拦截器放在外面会
对整个页面生效 axios.interceptors.request.use... 拦截器表示在axios请求发送之前做一些事axios.interceptors.response.use表示接收到响应,先经过拦截器,在执行then方法
<!DOCTYPE html>
<html lang="en">
  <head>
    <meta charset="UTF-8" />
    <meta name="viewport" content="width=device-width, initial-scale=1.0" />
    <title>Axios使用</title>
    <!-- <script src="https://cdn.bootcdn.net/ajax/libs/axios/0.21.1/axios.min.js"></script> -->
    <script src="https://unpkg.com/axios/dist/axios.min.js"></script>
  </head>
  <body>
    <button id="get">get</button>
    <script>
      var getBtn = document.getElementById("get");
      axios.interceptors.request.use(
        function (config) {
          // Do something before request is sent
          console.log("request拦截器---开始");
          return config;
        },
        function (error) {
          // Do something with request error
          return Promise.reject(error);
        }
      );

      // Add a response interceptor
      axios.interceptors.response.use(
        function (response) {
          // Any status code that lie within the range of 2xx cause this function to trigger
          // Do something with response data

          console.log("2xxloading---结束");
          //   return response; // 这里可以对response进行处理,会返回到then的回调函数中的res
          return {
            ...response,
            data: "自定义数据",
          };
        },
        function (error) {
          // Any status codes that falls outside the range of 2xx cause this function to trigger
          // Do something with response error
          console.log("not 2xxloading---结束");
          return Promise.reject(error);
        }
      );

      getBtn.onclick = function () {
        axios.get("http://localhost:3000/news").then((res) => console.log(res));
        //   .then((res) => console.log(res.data));
      };
    </script>
  </body>
</html>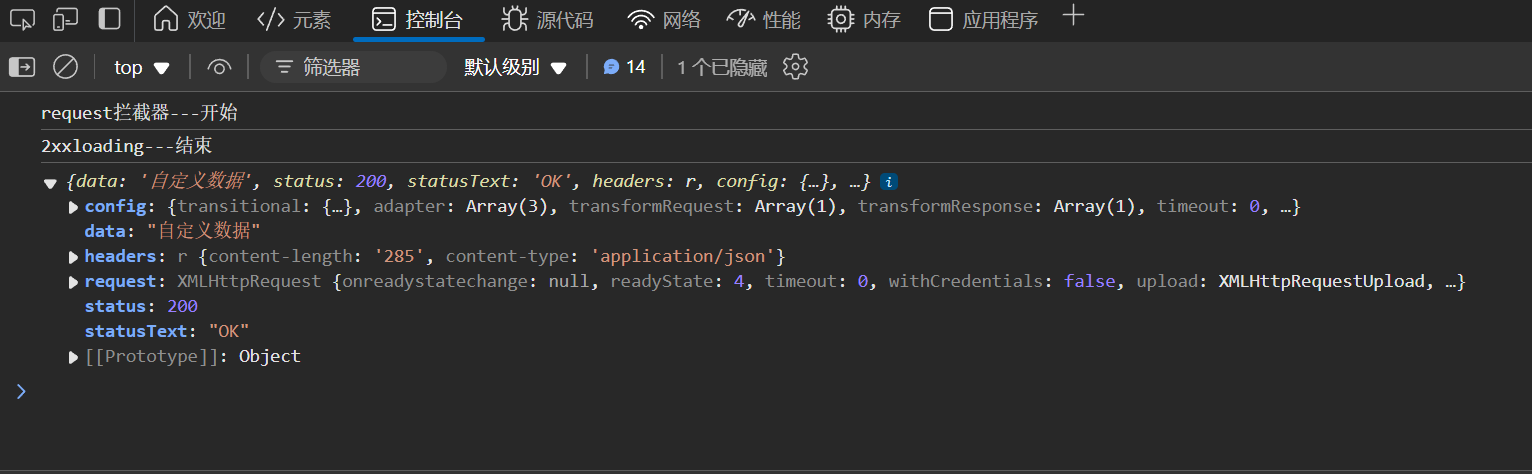
7. axios中断器
const controller = new AbortController();

axios.get('/foo/bar', {
   signal: controller.signal
}).then(function(response) {
   //...
});
// cancel the request
controller.abort()
/* 中断器 */
const controller = new AbortController();
getBtn.onclick = function () {
axios
.get("http://localhost:3000/news", { signal: controller.signal })
.then((res) => console.log(res))
.catch((err) => console.log(err));
};
var abortBtn = document.getElementById("abort");
abortBtn.onclick = function () {
controller.abort();
};8. axios请求案例
<!DOCTYPE html>
<html lang="en">
  <head>
    <meta charset="UTF-8" />
    <meta name="viewport" content="width=device-width, initial-scale=1.0" />
    <title>Axios使用</title>
    <script src="https://cdn.bootcdn.net/ajax/libs/axios/0.21.1/axios.min.js"></script>
  </head>
  <body>
    <button id="get">get</button>
    <button id="post">post</button>
    <button id="put">put</button>
    <button id="patch">patch</button>
    <button id="delete">delete</button>
    <script>
      var getBtn = document.getElementById("get");
      var postBtn = document.getElementById("post");
      var putBtn = document.getElementById("put");
      var patchBtn = document.getElementById("patch");
      var deleteBtn = document.getElementById("delete");

      getBtn.onclick = function () {
        axios
          // .get("http://localhost:3000/users?name=李四")
          .get("http://localhost:3000/users", {
            params: {
              name: "李四",
            }, // axios可以直接传入参数,不需要自己拼接url
          })
          .then((res) => console.log(res.data))
          .catch((err) => console.log(err));
      };
      postBtn.onclick = function () {
        axios
          // 这样是传入json格式
          // .post("http://localhost:3000/users", {
          //   name: "张三",
          //   age: 20,
          // })
          .post("http://localhost:3000/users", "name=赵六&age=20") // 传入form编码的字符串
          .then((res) => console.log(res.data))
          .catch((err) => console.log(err));
      };
      putBtn.onclick = function () {
        axios
          .put("http://localhost:3000/users/5e39", {
            age: 170, // 完全替换
          })
          .then((res) => console.log(res.data))
          .catch((err) => console.log(err));
      };
      patchBtn.onclick = function () {
        axios
          .patch("http://localhost:3000/users/5e39", {
            age: 170, // 补丁式的更新
          })
          .then((res) => console.log(res.data))
          .catch((err) => console.log(err));
      };
      deleteBtn.onclick = function () {
        axios
          .delete("http://localhost:3000/users/5e39")
          .then((res) => console.log(res.data))
          .then((err) => console.log(err));
      };
    </script>
  </body>
</html>
五. 同源策略(Same-origin policy)
一个 URL 有三部分组成:协议、域名(指向主机)、端口,只有这三个完全相同的 URL 才能称之为同源。如下,能和 http://www.example.com/dir1/index.html 同源的是?
| URL | 结果 | 原因 |
|---|---|---|
http://www.example.com/dir2/api |
同源 | 只有路径不同 |
https://www.example.com/api |
不同源 | 协议不同 |
http://www.example.com:81/dir1/etc.html |
不同源 | 端口不同 ( http:// 默认端口是80) |
http://www.kerwin.com/dir1/other.html |
不同源 | 域名不同 |
(1) 无法读取非同源网页的 Cookie、LocalStorage 。
(2) 无法接触非同源网页的 DOM。
(3) 无法向非同源地址发送 AJAX 请求(可以发送,但浏览器会拒绝接受响应)。
注意:
同源策略是浏览器的行为,是为了保护本地数据不被JavaScript代码获取回来的数据污染,因此拦截的是客户端发出的请求回来的数据接收,即请求发送了,服务器响应了,但是无法被浏览器接收。
六. jsonp
Jsonp(JSON with Padding) 是 json 的一种”使用模式”,可以让网页从别的域名(网站)那获取资料,即跨域读取数据。
为什么我们从不同的域(网站)访问数据需要一个特殊的技术( JSONP )呢?这是因为同源策略。
const script = document.createElement('script')
script.src = './kerwin.txt'
document.body.appendChild(script)
实战
mysearch.oninput = function(evt){
    console.log(evt.target.value)
    if(!evt.target.value){
        list.innerHTML = ""
        return
    }

    var oscript = document.createElement("script")
    oscript.src = `https://www.baidu.com/sugrec?pre=1&p=3&ie=utf-8&json=1&prod=pc&from=pc_web&sugsid=36542,36464,36673,36454,31660,36692,36166,36695,36697,36570,36074,36655,36345,26350,36469,36314&wd=${evt.target.value}&req=2&csor=1&cb=test&_=1656294200527`
    document.body.appendChild(oscript)

    oscript.onload = function(){
        oscript.remove()
    }
}

function test(obj){
    console.log(obj.g)

    list.innerHTML = obj.g.map(item=>
                               `<li>${item.q}</li>`
                              ).join("")
}
- 还有一种解决跨域访问的手段就是
后端在返回HttpResponse响应的时候,设置响应头中Access-Control-Allow-Origin: *
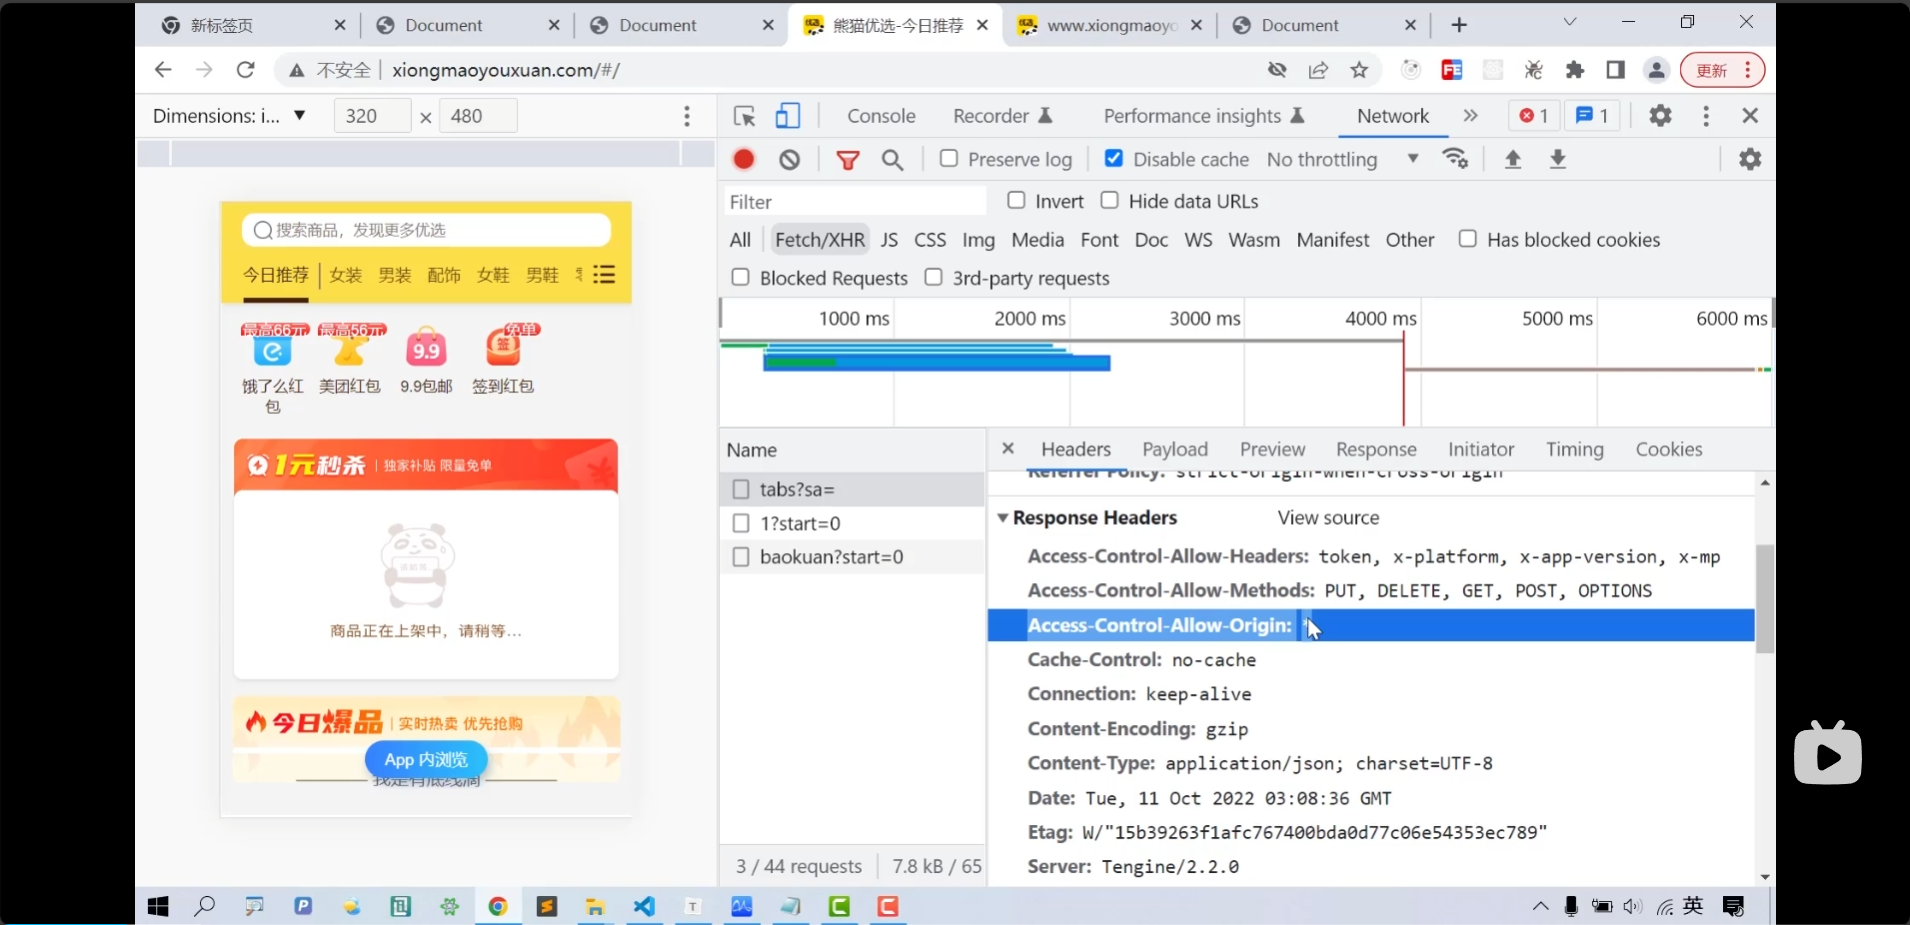
- 有时候还要在请求头中加上对应的标头
<!DOCTYPE html>
<html lang="en">
  <head>
    <meta charset="UTF-8" />
    <meta name="viewport" content="width=device-width, initial-scale=1.0" />
    <title>卖座网解决跨域</title>
    <script src="https://unpkg.com/axios/dist/axios.min.js"></script>
  </head>
  <body>
    <script>
      url =
        "https://m.maizuo.com/gateway?cityId=440300&pageNum=1&pageSize=10&type=1&k=1032295";
      //   axios
      //     .get(url)
      //     .then((res) => console.log(res))
      //     .catch((err) => console.log(err));

      axios({
        url: url,
        headers: {
          "x-client-info":
            '{ "a": "3000", "ch": "1002", "v": "5.2.1", "e": "1733463319789110046326785"}',
          "x-host": "mall.film-ticket.film.list",
        },
      }).then((res) => console.log(res.data.data));
    </script>
  </body>
</html>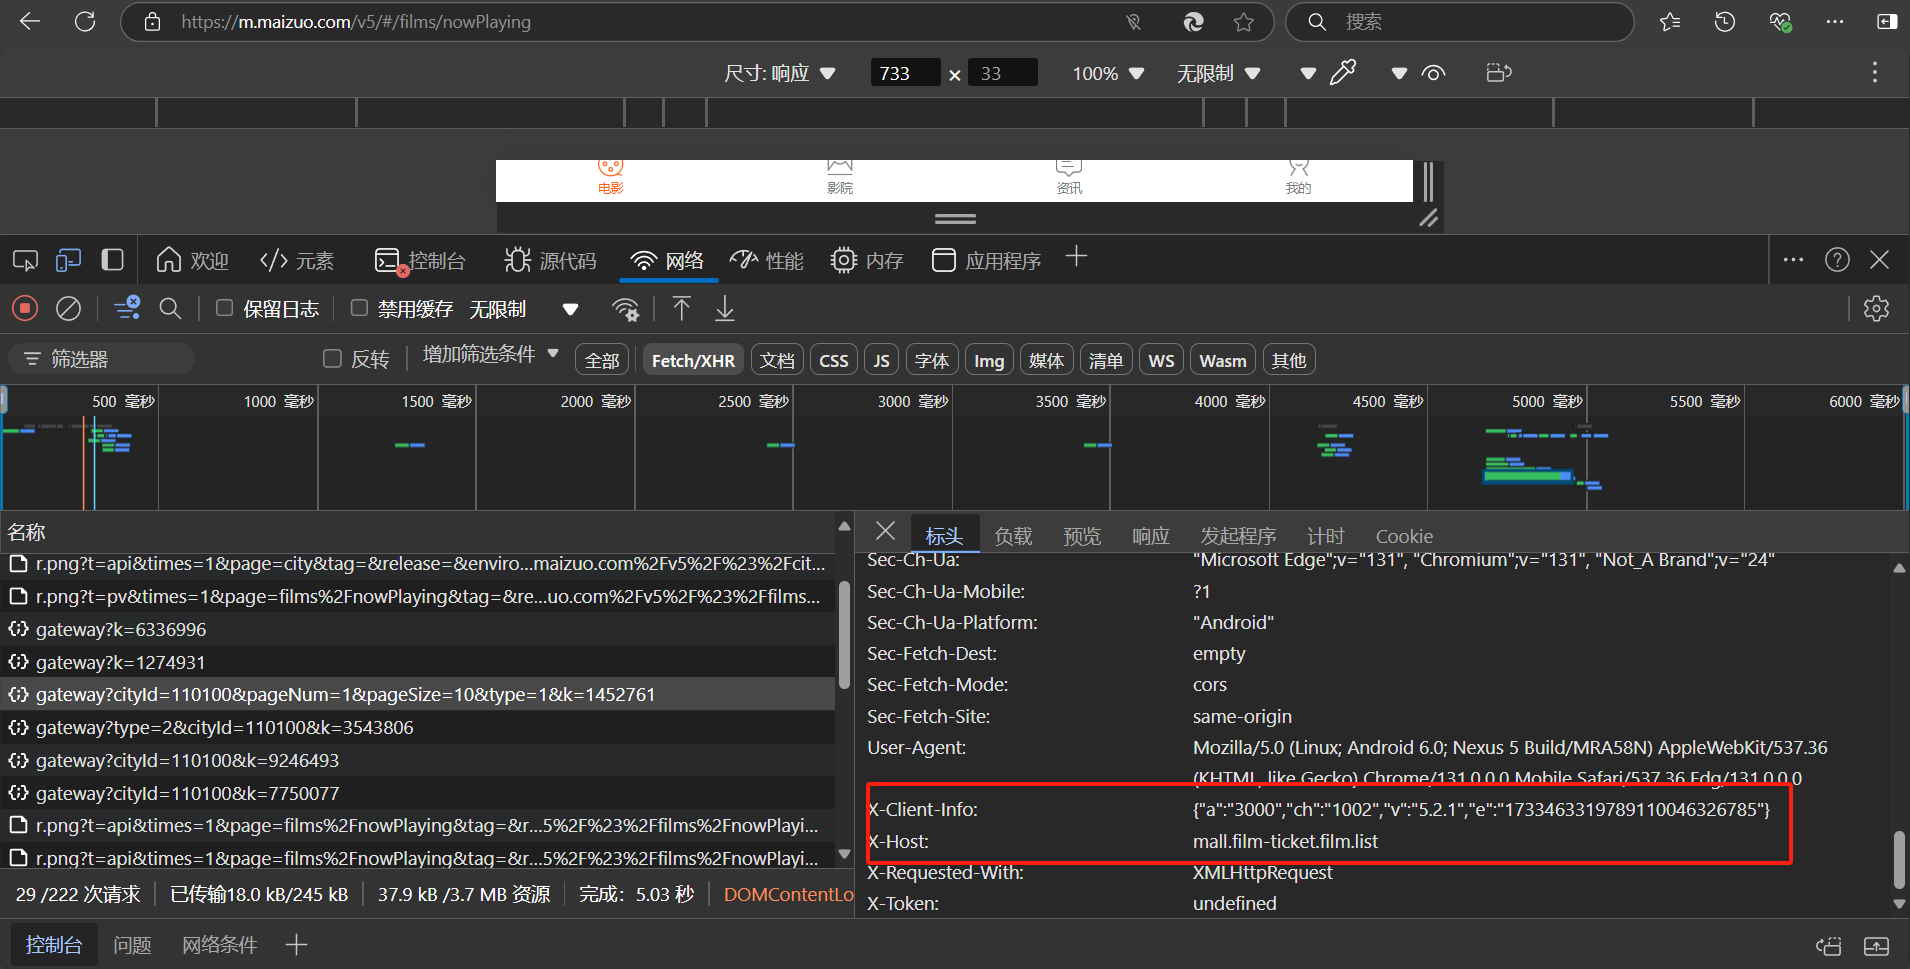
七.反向代理
猫眼数据接口https://i.maoyan.com/api/mmdb/movie/v3/list/hot.json?ct=%E5%B9%BF%E5%B7%9E&ci=20&channelId=4
对于这样的接口,既不是jsonp格式,又没有使用Access-Control-Allow-Origin: *
可以使用反向代理
- 下载nginx
- 解压到
全英文路径下 - 在exe文件路径下创建一个新文件夹
mystatic,并放入你的静态html文件 - 复制一份
./conf/nginx.conf文件,重命名为test.conf,并修改

- 命令行输入(指定配置文件)
.\nginx.exe -c .\conf\test.conf<!DOCTYPE html>
<html lang="en">
<head>
<meta charset="UTF-8" />
<meta name="viewport" content="width=device-width, initial-scale=1.0" />
<title>Nginx反向代理</title>
<script src="https://unpkg.com/axios/dist/axios.min.js"></script>
</head>
<body>
<h1>Nginx演示跨域</h1>
<script>
// vue react项目 配置反向代理
// nginx
axios
.get(
"/api/mmdb/movie/v3/list/hot.json?ct=%E5%B9%BF%E5%B7%9E&ci=20&channelId=4"
)
.then((res) => console.log(res));
</script>
</body>
</html>